Tuesday, October 25, 2011

Spotlight on Marc Chagall

Marc Chagall was born near Vitebsk, Russia on July 6, 1887. He was the oldest in a family of nine children of a poor Hassidic Jewish family. During that time, Jews were segregated from the Russian school system, so Chagall attended a Jewish religious school until the age of 13. In a daring move, his mother bribed a professor to let him into the Russian high school, where he was introduced to the new and foreign world of artistic creation. He was immediately taken with the concept of creating art and decided then and there that he would become an artist himself.

By 1906, Chagall was on his way to fulfilling that dream. He discovered a small art studio in Vitebsk and was taken in by Yehuda Pen, where he was taught art and portrait painting. Not content to simply paint academic portraits, Chagall managed to relocate to St Petersburg, where he enrolled at one of the many art schools in Russia's capitol. Naturalistic self-portraits and landscapes were a mainstay of his style during this time. He then met Leon Bakst, whom he studied under until 1910. Bakst was a fellow Jew and a renowned artist in his own right. He helped to introduce Chagall to the theatre and another world of stage sets, costume design and other artists (ie. Paul Gauguin) that would influence him over his life.

Marc Chagall, I and the Village
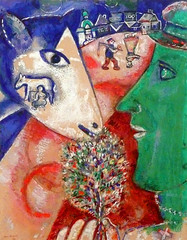
I and the Village - 1911
In need of a change and at a point where he felt that he could use an expansion of his artistic style, Chagall moved to Paris in 1910. There he met several poets and discovered the Cubist movement. While he was heavily influenced by this new style for him, he brought to it a love of colour that became a trademark of his own personal style throughout his life. He enrolled at La Palette and soaked up all aspects of Parisian life and art. It was a time of extensive creativity for him and he painted many canvases, gouaches, watercolors, as well as several drawings. He also attracted the attention of a German art dealer, who invited him to display his art at an exhibit in Berlin in 1914. It was well received and Chagall returned to Vitebsk as a more notable artist, with a plan to marry his sweetheart Bella and return to Paris with her. While back on Russian soil, World War I broke out though and the borders were closed, keeping Chagall and his new bride there.

The White Crucifixion - 1938
Life in Vitebsk during the war years was kind to Chagall and his new family. He had a child, Ida, and became a Commissar for Fine Arts, followed by the Director of the brand new Free Academy of Art. In 1922, he relocated back to France and stepped back into the art world there that he loved so much. Over the years that followed, he enjoyed a growing fame, with exhibits in France, as well as a first exhibit in the United States in 1926. In 1931, he travelled to Palestine to delve into the history of the Jews and their mythologies in order to better understand and create illustrations for a copy of the Old Testament of the bible  for Ambroise Vollard. His two months spent in the holy land unleashed a brand new fascination with biblical images, that carried through into much of his later artwork.

The coming of Hitler and the Second World War brought a devastating change across Europe. While Chagall was focused on his work, he missed many of the initial signs of what was to come, until it was almost too late. With the help from some dedicated American art enthusiasts, he was smuggled out of France in 1941. He lost his beloved wife in 1944, due to a virus infection and withdrew from his work for a period of time. The horror stories about concentration camps appalled him though and he slowly returned to the art scene. After the war finally ended, he mourned his French home and decided to return in 1948, settling in Cote d'Azur.


The Tribe of Benjamin (Stained Glass) - 1962
Chagall remained in France for the rest of his days. He explored the mediums of sculpture, ceramic art, murals, mosaics, stained glass, painted vases, tapestries as well as wall tiles, in addition to his paintings and graphic art. Throughout all of his varied mediums he reveled in colour and often had happy scenes depicted. He seemed always to draw from his early days in Vitebsk, pulling scenes from his love of the circus and Jewish life. He displayed influences of Fauvism, Cubism and Surrealism, but created a style that was all his own over his long artistic career. The world lost a magnificent artist on March 28th, 1985.

Despite his passing, Chagall has left behind a wonderful legacy. Considered to be an early Modernist, he is a master artist worth celebrating. Budding Artists recognizes his contributions and are celebrating them themselves this coming Saturday at the Crafting the Masters Series Art Workshop for children. A 90-minute workshop on his art techniques, including art history, games, stories and of course an art project to take home, will thrill your own Budding Artist. Join us on October 29th and explore the world of Marc Chagall for yourself.


Tuesday, October 18, 2011

A Wall of Art

So the art work comes home from school, you admire it, then wonder 'what now'. Turning to the pile of artwork that has come home recently, you find a mountain growing. If you want to encourage your budding artist, but aren't sure how best to do that without drowning in kid art, then take a look at this fun idea that I came across over at ohdeedoh.com.


Source: ohdeedoh.com via Maria on Pinterest


Isn't that amazing! A wall dedicated to kids artwork! Not in a messy, can't-see-a-thing kind of way though. If you have a wall that is begging for a bit of colour, you could do this too. All you need is a few frames and the art work to go in them. You can either pick the frames first, then have your children create the artwork on appropriate sized paper or start with already existing art work that you feel wows you and find frames to make it pop.

Once the frames are arranged on the wall, you might also decide to make it a rotating photo gallery. Once a month you could add new artwork, either cropped  or matted to fit your frames, or have a special art session that is all about your art wall. If you have an art session, then you could even colour coordinate your masterpieces. Another thought might be to have a theme for the month, ie. still life with fruit, silhouettes, art work in the style of your favourite artist (Munch anyone?). The sky is the limit as far as creativity goes.

I also love the chalk board at the bottom - a perfect height for kids! If you want to make the wall even more interactive, you could add the chalkboard, or make the whole wall a chalk board! Keeping it framed at the bottom gives a semblance of neatness that some might find appealing, but having the whole wall a chalk board might be fun too. That way your child can practice their writing, while adding a title to their pieces. You might be adding a whole new aspect to the creative process!

Yes, that mountain of artwork will now seem like a mole hill, I suspect. Your child will be so proud to show off their artwork to their friends, neighbours and Grandma when she comes to visit. You can feel good too, knowing that you are helping to develop your child's creativity and sense of self-worth in a way that is a pleasure for all to enjoy. Here's a project to get your Mom of the Week stars right here!

Tuesday, October 11, 2011

Spotlight on Edvard Munch

Self Portrait 1881-1882
Edvard Munch was born on December 12, 1863 in Løten, Norway to Christian Munch and Laura Catherine Bjølstad. He was the second oldest, in a family of five children. Sadly, his mother died in 1868 from tuberculosis, followed not long after, from the same deadly disease, by his oldest sister in 1877. While his aunt took over in raising himself and his remaining siblings, these events coloured Munch's outlook on life for years to come.

Not a healthy young man in his own right, Munch spent much of his youth out of school, usually at home drawing to fill the hours. His father instructed him in history and literature, but art was his true passion from an early age. In 1879 he entered a technical school to study engineering, but a year later, much to his father's disappointment, he left to pursue a career as a painter. By 1881, he was enrolled at the Royal School of Art and Design and in 1883 he took part in his first public exhibition.

The Sick Child - 1886
Munch created many self-portraits throughout his life, but through associations with Christian Krohg and Hans Jaegger, his work slowly started to transform during his early formative years. Krohg was a Naturalist painter that influenced Munch during his time at the Royal School of Art and Design. Jaeger was a local nihilist and member of the 'Christiania's Bohemia', who urged Munch to delve into his emotions within his artwork. It was during this time that he worked on his soul diaries, and also when he created one of his first well known paintings 'The Sick Child'. This dark painting spoke of his sister's death, but also of the depressing mindset that he lingered under. He struggled with the concept of a soul in conflict with nature and his work reflected that at the time. As his skill grew, he found that the Impressionism that he had first utilized did not adequately express the angst that was in his soul and he moved towards a post-Impressionistic style.

The Scream - 1893
In 1889, Munch displayed a collection of his works at the Student Organization in Christiania. It was so well received that he earned himself a two-year scholarship to the Bonnat School of Art in Paris. There he was introduced to works from painters such as Gauguin, Van Gogh and Toulose-Lautrec, who all used colour to depict emotions. He took these concepts and made them his own. That same year, his father died, leaving the care of his remaining siblings under his responsibility. His father's death increased the underlying depression that plagued Munch throughout his life, but he managed to carry on. Sadly, his work during that time reflected his means of coping, namely depictions of dark taverns where he tried to drown his sorrows.

By 1892, a bright spot entered Munch's life in the form of an invitation to exhibit his work at an exhibition with the Union of Berlin Artists in Germany. While his artwork caused enough controversy to shut down the exhibition after only one week, this pleased him enough to make Berlin home for the next four years. During his time there, he worked on his 'Frieze of Life', which was a collection of pieces that represented life, death, anxiety, hopelessness, jealousy and sexual humiliation. They caused a stir that could not be ignored.  Munch also began to experiment with lithographs, woodcuts and photographs to allow his artwork to be seen by a wider audience.

The Day After - 1894
The depression that plagued Munch throughout his life came to a head in 1908. Always prone to the drink, after a devastating breakup with Tulla Larsen, he became a heavy drinker and suffered from even more health problems. By the fall of the that year, he checked himself into a clinic in Copenhagen and remained there for eight months. The effects of his treatment are seen in his subsequent artwork, as his tone was often less dark and pessimistic after that.

During his remaining years, Munch led a more secluded lifestyle. He finally won recognition and praise in his home country and was able to buy property in Ekly, Norway. While he continued to paint, landscapes now reigned, as well as many portraits. The war years were difficult for him, as he had many friends in Germany, but did not support Hitler's regime. When the Nazis took over Norway, he subsequently hid all of his artwork to prevent it from being discovered. On January 23, 1944 Edvard Munch died peacefully at home.

Munch was nothing, if not a master of emotion. His use of colour and raw emotion lent itself to many dramatic works that are just as familiar today as they were then. His iconic painting "The Scream" is recognized by one and all and this coming Saturday, Budding Artists will be exploring the life and styles of this gifted painter. So if you have a budding artist in your home, why not think about having them join us for our art workshop this week.


Thursday, October 6, 2011

What Time Is It?


What Time Is It? Craft Time!


Hold your horses and wrap your mind around this fantastic art project that you can do with your kids - a Hand-Designed Photo Frame Clock. In fact, it can be an art project that will carry you over 14 days! One day for each picture that corresponds with a number on the clock, another for painting your frames and the last day for assembly. Got you covered for two weeks of creativity with the kiddos here! The excitement and pride you all will have as the final project gets attached to the wall, will be well worth the effort as well. So go ahead and get crafty!

Now, while I cannot lay claim for the original idea (found this awesome clock on the ohdeehdoh.com website), I think that with a little finagling this would be a fun and functional art project to do with your own kids. So what do you need for this unique craft idea? It depends upon how much work you want to put into it. You could always pick up pre-painted frames and just add artwork, but if you want to take this project one step further (like we do!), you could pick up some plain frames and paint them in hues of your own choosing. You can mix and match frame shapes and sizes or keep them all a uniform size. Its all up to you! So, let's see what we require for today craft;

HAND-DESIGNED PHOTO FRAME CLOCK


ITEMS YOU WILL NEED:

  • 12 unfinished photo frames
  • Acrylic paint (various colours) 
  • clear coat
  • paint brushes, sponges and other applicators (various sizes to give different depth/style per frame)
  • 12 pieces of paper to create 12 wonderful & unique backdrops for your clock faces
  • 1 clock mechanism 
  • nails
  • hammer
  • level
  • pencil
  •  

DIRECTIONS:

    Day 1- Day 12:

  • Break out the paint, pencils and pastels, its time to get crafty! Set your child up at the easel to create a masterpiece every day. Experiment with different colours, a variety of applicators (sponges, paint brushes, apples, potatoes, leaves, etc.), and whatever else you think might work for the artwork you want to highlight. Introduce other mediums like chalk, crayons or pencil crayons too! You are only limited by your imagination!

Day 13:

  • Now that your masterpieces are complete, it is time to decorate the frames. I suggest that you save the frames for last, as this way you can colour coordinate your frames to the pictures that are going to go in them. Open up the acrylic paints and start designing your frames! Make sure the frames are well coated, so that their colour lasts.
    • Additionally, you can clear coat the frames to ensure that the frame's vibrancy remains intact for years to come. This is not absolutely essential, but it will give longevity to this special piece. Leave the frames to dry overnight to ensure that no tackiness remains before you hang your frame clock the next day.

Day 14: 

  • Ensure that your frames and artwork are all completely dry before proceeding with the last step to install your clock. Remove the back from your frames and insert the artwork into them. Now take a look at your framed pictures and decide what order you want to put them in for your clock face. Hint: A dry run will help to prevent rearranging your pieces after the nails have been hammered in, if you have frames of varying sizes. With the help of a pencil and your level, mark on the wall where your pictures will be hung, marking sure to note the centre for the clock mechanism as well. Carefully hang your pictures and put the clock mechanism in place. 

Voila! You know have your very own hand-designed photo frame clock, as designed by your children. It will be an eye-catching conversation piece for years to come. You can even have your children create new artwork for the clock in the future, if you want to update the look of it.

Tuesday, October 4, 2011

Self Portraits


Here are self portraits created by the participants of the Da Vinci workshop. We looked at the Mona Lisa and discussed facial proportions. The kids used pastel.